1. From Wordpress admin, vous devez installler le plugin :2. For the server side :Source : https://github.com/maximejobin/rocket-nginxNB : you must desactivate any other cache system before proceeding
1. Basic optimization of Wordpress recommended :
Add inwp-config.php:define('DISABLE_WP_CRON', true);and cron : */15 * * * * wget -q -O /dev/null "https://www.yourdomain.com/wp-cron.php"
You can verify proper working with log output :
/usr/local/bin/php /home//youruser/pathfoldernameofdomain/wp-cron.php -vvv 2>&1 > /home//youruser/pathfoldernameofdomain/cron.log
2. Install Rocket-Nginx with shell (putty)
(request shell access if not enabled, see our dedicated article to shell/SSH) :Replace 'youruser' by your user login cPanel, and 'pathfoldernameofdomain' by the folder name of website ('public_html' if this is the main domain of cPanel account) :##################
cd /home/youruser/pathfoldernameofdomain OR cd /home/youruser/public_html
git clone https://github.com/maximejobin/rocket-nginx.git
cd rocket-nginx
cp rocket-nginx.ini.disabled rocket-nginx.ini
php rocket-parser.php
cp -p default.conf ../nginx.conf
##################
3. In your cPanel, go at bottom to icon to Nginx-Manager :
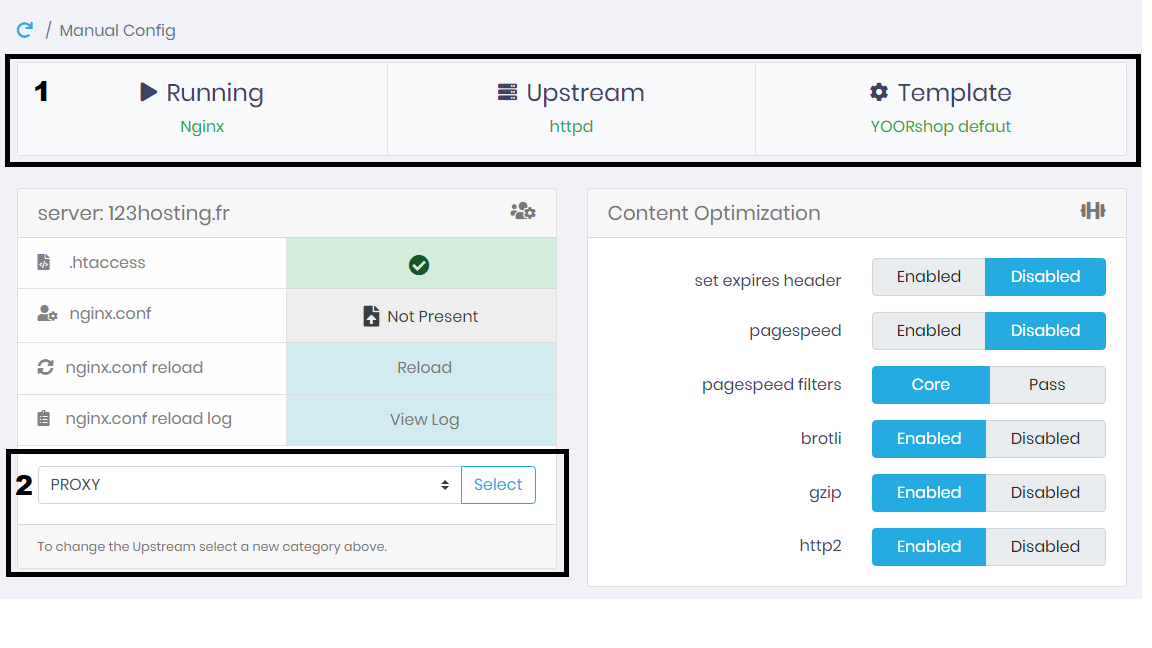
Config: choose the domain to configure, and click on ConfigureAfter, you reach the panel with all settings for the concerned domain, see below :By default, your account is set to run with httpd (point 1), which correspond to PROXY at point 2Recommended : stay with UPSTREAM httpd with default template YOORshop DefautIf you want to use UPSTREAM PHP, this will add complication due to .htaccess, please refer :(Ref : https://support.yoorshop.hosting/knowledgebase/3931/How-to-configure-a-site-with-NGINX-PHP-FPM.html )
Next, once you changed UPSTREAM to PHP, make sure that template used is YOORshop WordpressCheck now in 'Content Optimization', with both UPSTREAM PROXY/PHP, you must let 'Expires / Cache-Control' to disabled, click at bottom on button 'Save settings'
(If the files on your site are not in the root directory of the domain, you will have to use Subdirectory Applications by giving the name of the subfolder, and choose the TEMPLATE : Wordpress in subdir)Still in Nginx-Manager, restart from beginning, choose the domain.You need to load properly your new file nginx.conf (line nginx.conf)
You will see a confirmation or not if what you have entered is invalid or need reload nginx : Invalid/Require Reload, click on Reload button of line below 'nginx.conf reload'. If all ok, you will see on line nginx.conf : ValidThat's it ..rocket nginx is now activated for the account. User can change settings via update of file nginx.confCache is normally set and managed as dynamic by UI plugin in WP, to purge cache immediately, either from UI of plugin , or you can delete content of folder : /wp-content/cache/wp-rocket/Suggestion, you can reduce cache from 30 days to 1 day in these settings at bottom (expires 30d; = expires 1d;) ( you can also set it to 8 hours with expires 30d; = expires 8h;), and reload nginx.conf via nginx plugin manager :###################################################################################################
# BROWSER CSS CACHE
#
location ~* \.css$ {
etag on;
gzip_vary on;
expires 30d;
}
###################################################################################################
# BROWSER JS CACHE
#
location ~* \.js$ {
etag on;
gzip_vary on;
expires 30d;
}
###################################################################################################
# BROWSER MEDIA CACHE
#
location ~* \.(ico|gif|jpe?g|png|svg|eot|otf|woff|woff2|ttf|ogg)$ {
etag on;
expires 30d;